
Truth about WordPress Speed
Out of curiosity, why don’t all these blog posts from affiliate sites, hosting companies, theme developers, AdSense sites, plugin owners (or anywhere else) ever grow some gumption and say _(something like)_ :
“STOP UPLOADING BIG ASS IMAGES IN THE FIRST PLACE!!!”
I can’t quite say I’ve ever seen a post resembling that much truthful bluntness. So, perhaps I can add a bit of gentle rhetoric around that message while still maintaining the importance of the above text in red. Here goes.
Use a FIXED WIDTH – NOT FLUID
Every WordPress Theme is unique. Some themes have an option of fixed or fluid width. Fluid width, flexible width, or full screen width might be additional terms to use – but the result is the same. On any screen possible, the theme is designed to take up as much room as possible.
That would also be known as incredibly impossible, not possible, no way in the world, not actually going to really happen, for your own sake please stop thinking that it looks cool in-your-own perspective.
[cp_modal display=”inline” id=”cp_id_e6d4c”][/cp_modal]
As someone told me years ago, “This is Business: Unless Y-O-U can print your own money, your own opinion does NOT mean jack sh!t. Never forsake that mindset.”
Although a fluid, flexible width, full screen choice for a theme might make the creator of a website feel better about the appearance of their presentation, here’s what that actually turns into on a very pragmatic and practical level:

Those are the top 4 screen resolutions… for VIEWERS…. for CONSUMERS…. for your CUSTOMERS…. for the PEOPLE-WHOM-YOU-WANT-MONEY-AND-A-TRANSACTION-FROM
So, when it actually comes down to it, do you really need to upload that 3000+ pixel image from your iPhone 9+Xd Cannon LR8 Samsung 9plus Drone carrying GoPro mounted to the Nikon dL1700 (…..pretty sure that’s not actually a ‘thing’, but you get the point, right?)
…and let’s never forget, you’re serving the image over the internet to your customer! ….on their phone …or their tablet …or their desktop.
Even with the ‘retina’ hooplah, there’s almost ZERO people, no percentage, minute ‘session data’, that indicates anyone has viewed your content on any display that can utilize or view a 3000+ pixel image.
So don’t upload it in the first place!
I’ve never been one to mix words or talk about fluffy bullsh!t just to get pageviews, ad impressions, or affiliate link clicks for ‘yet-another-image-optimization-service’.
I hope that you’ll open your site’s Analytics and look for yourself. Here, let me show you how to do that:
Click this link to open your site’s Google Analytics:
https://analytics.google.com/analytics/
Now, over on the left hand side, click on Audience > scroll down and click on the word Technology > then click on Browser & OS.

Next, see that double red box that I’ve highlighted below? That’s where you’ll need to click next.

Now, I want you to really look at your own customer data:
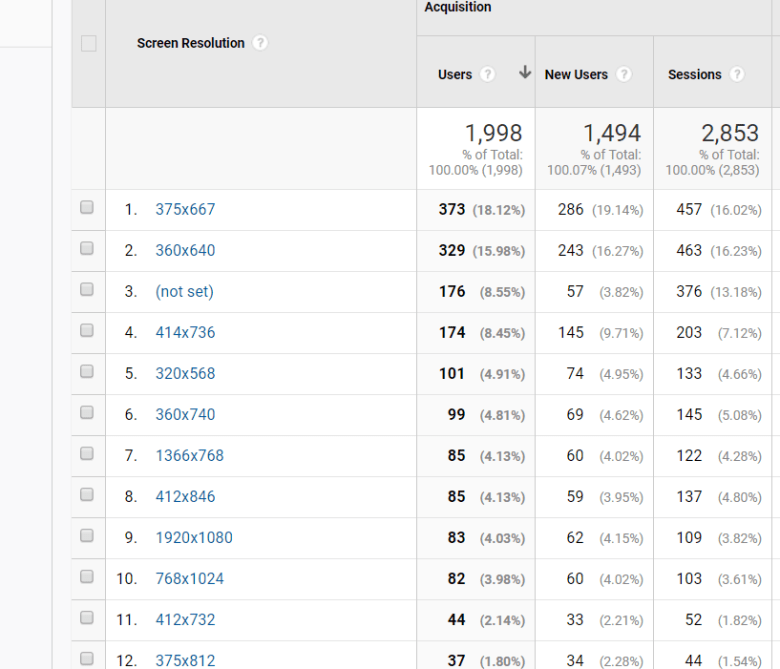
Browser Size from Google Analytics WILL VERIFY and help you understand how CRITICAL it is to resize your images BEFORE you upload them to your site.
Look at your own numbers. No really. I want you to really open your Google Analytics and check out the real numbers for yourself.
Remember, there’s not any affiliate links to some image optimization service in this post, no fluff, and…..
I’m all up in the BUSINESS end of WooCommerce sites – no bullsh!t allowed!

I am now, and will always be, a proponent of understanding the psychology and empathy of the typical WooCommerce Store Owner. I truly believe that once a person SEES the data, they are much more behaviorally likely to better comprehend the need to not upload the image in the first place.
Open your site and you’ll get an actual understanding of how your customers are viewing your WooCommerce Store.
Are you starting to see why every WooCommerce Site needs to select a FIXED Width? Good. Now open your theme, toggle it to FIXED and come back over here and we’ll finish up some more.

Find the biggest div:
If you’ll look at your site, I want you to find the biggest area for an image that you see.
Is it in the header of the site? Do you have a gigantic hero image? What about a footer background image? Perhaps both of those areas are simply a solid color and your theme doesn’t use an image for those spots. So let’s look at the blog post featured image. And, most importantly, let’s look at the WooCommerce images to see what size those should be.
Here’s how: (we’ll be using the WordPress Swag Store for this example. Go ahead and open that up and we’ll go through it together: https://mercantile.wordpress.org/ )
See how simple that was? Slow down a second or two and take a few moments to go ahead and do that same thing over on your site right now before we move forward.
Ok, If you’re reading this line, then obviously you’ve completed the previous step, right? Right? 😉 Ok, let’s just continue moving forward now that you know what the largest image size would be for your particular theme, theme options, and site’s settings.
Use PaintdotNet
For most Business Owners, a simple, quick, easy, and FREE (yes, it’s totally FREE!) photo editing program is all that’s needed.
If you’ve never used, or heard of PaintDotNet (yes, it’s a bit tricky to say but literally they put the full-spelled-out-word DOT in the name of it. Totally not sure why!) click the link below to open the site to download it. After you’ve downloaded it and opened it up, lemme show you how simple, easy, and quick it is to use.
(lest we forget: our goal, mission, objective, and point here is to NEVER UPLOAD the HUGE image in the first place)
https://www.getpaint.net/download.html
Ok, now that you’ve got it opened, follow along:
Wait, amongst a few video flubs, did it actually take only a few clicks and a few seconds to resize the image?
YES!
And, that’s what I simply can not stress enough. It really doesn’t take but a few seconds to resize the image before it even makes it to your hosting account, your WordPress site, mangled in with a bunch of plugins, and then (attempted to be) delivered to your customer’s eyeballs.
Even if you’ve got ten images to upload to your site, once you go through the motions and clicks a few times, you’ll start to realize something pretty powerful.
Remember all these WordPress Image Optimization services that seem to be popping up almost once a month?
Well, truth be told: In the time it takes you to configure, connect, pay, debug, put-in-a-support-ticket, match your API keys, and manage any plugin conflicts, you probably could have taken that possibly ongoing & frustrating time, redirected it to simply using an image editor like PaintDotNet, and been on your way to a faster site.
Speaking of plugins…………..
STOP Using CRAP CODED plugins and themes
….said with love. …but honest love
This can almost always be seen in the WooCommerce Loop pages of /shop/ and /product-category/
Right click on an image in your WooCommerce Store and look at the parts below in red:

That is on the /shop/ page of a WooCommerce site. See how the theme is generating the area to be displayed at 226 x 226 pixels. Now look at the image . The image itself is 300 x 300.
Now, you might not think that there’s too much of a difference there, but it adds up quickly. Don’t forget that this is on the WooCommerce /shop/ page.
When there are 14 other images on the page (plus the logo and a few others), then each time that page comes up to the customer, it’s loading somewhat slowly. Let’s not forget – our goal is to get the site fast and in front of the customer as quickly as possible.
Here’s what you do in that case: Your goal is to resize the product thumbnail images to be 226 x 226
Now, let’s think about what a cluster of a conundrum and problem this is to fix…….
- Each of the thousands of WordPress Themes is totally unique
- WooCommerce allows a theme author to set unique and specific options for “how” the images specific to WooCommerce are going to be displayed throughout the theme
- And, as if the rabbit-hole isn’t deep enough already, each and every site owner has their own individual mashup of plugins which can take over how the images are displayed -not just in WooCommerce- but through out their whole WordPress installation ‘in genera’
WHEW! See how fun this can be?
Look, the first thing to do here is to get a stiff drink, sit down by yourself in a padded room and prayerfully take a look at your site, theme, plugins, options and settings.

Some people are still “kickin’ the tires and playin’ with sliders” in their site. If that’s you, then this next part does not apply to you.
Now, for the WooCommerce BUSINESS Owners who want to run a business and not play with a website, here’s what we’re going to do. Read these instructions all the way through b/c we do not want to miss anything.
Remember that in every WooCommerce site, you’ll want to have the most efficient and streamlined store.
You DO NOT want your hosting account CONTINUALLY fixing your images. But, yes, it is ok to go ahead and run this plugin, but….
DELETE THIS PLUGIN WHEN YOU ARE DONE!
(and learn from the experience that it’s better to not upload the image in the first place)
Look, be it Pagely’s high amount of php service workers at hundreds of dollars a month, or SiteGround’s shared hosting at a few bucks…. You do not ever want your WooCommerce site to dedicate server resources to the-continual-fixing-of-images, so I’ll say this again before we move forward:
DELETE THIS PLUGIN WHEN YOU ARE DONE!
(and learn from the experience that it’s better to not upload the image in the first place)
Don’t put out a fire that shouldn’t exist in the first place: Never use Server resources to resize images. Simply do NOT upload images that are wider than your biggest div in the first place!
Lets go ahead and realize that some site owners do indeed have a substantial amount of images already existing in their site.
So, this is where you’re thinking I’m gonna suggest to use one of those third-party image optimization services right? Nope.
Download and Activate EWWW Image Optimizations Plugin:
EWWW Image Optimizer
Now, remember when we found the largest < div > size for the theme? Here’s where we are going to enter that number:

In the red highlighted box that says “Max Width”? That’s where you’ll want to enter that number. In the theme I’m using here, the largest area for the WHOLE theme is 1200 pixels wide. Now, in a regular blog post (JUST LIKE THIS ONE), the actual body content is going to be even smaller since there is a sidebar over to your right.
But just to be safe, we’ll leave that “Max Width” at 1200 in case there is ever a full header image used or something like that.
Next, swing on over to the tab labelled Convert.

See that box that I made glaringly obvious? 😉
YES: You want to remove the successfully converted images OFF YOUR SERVER!
If, for some reason, you’ve got a hesitation about deleting your 3000+ pixel images that are loading on your site, then simply back up your site. Now, the last step.
Run over to your Media tab and you’ll find the new option of Bulk Optimize.

Click the red button labelled ‘Scan for unoptimized images’.
Now, understand that this has now taken server resources in your particular hosting account and is using your hosting account just to fix those gigantic huge big oversized images.
Not cool.
Your site should be 100% focused on processing orders, serving page views, handling customer data, but now it’s simply churning through those images.
Please run this scan when your site visitors are at a minimum. Yes, I’ve gotten up at 3am just to run this on a client’s site. This is not the plugin you want to run when you’ve got minimal hosting serving traffic to a decent amount of browsers.
Ok, last thing:
Once this plugin is DONE, DELETE IT! DELETE IT!
DE-friggin’-LETE the DANG PLUGIN!
Solution, Conclusion, and Recap
Remember the goal was to skip the bull about images and get to the heart of a working solution, right!
A working solution which is quick, simple, and easy: which we saw from the PaintDotNet video how easy it is to resize images.
We needed a solution which does NOT utilize our hosting & server resources, on a continual basis: That’s why we do not want to put in a plugin that CONSISTENTLY creates an ONGOING waste of our server resources.
And, as a last ditch effort, we want to run EWWW correctly ONE TIME remembering to remove the old huge images, and then turning the plugin OFF, deleting it once we’re done, & pop our images into something like PaintDotNet real quick to resize the images to the right size before they ever get uploaded to our hosting and reach our customers.
Thanks!!!